
DIY Guide: Step-by-Step to Crafting Beautiful Christmas Silhouette Windows
The holiday season is a time of joy, warmth, and creativity. One of the most enchanting ways to bring the Christmas spirit into your home is through decorative window silhouettes. These charming cutouts not only enhance your window displays but also create a magical ambiance both inside and outside your home. In this comprehensive DIY guide, we will walk you through the steps to craft beautiful Christmas silhouette windows that will delight your family and neighbors alike.
Why Choose Christmas Silhouette Windows?
Christmas silhouette windows have become increasingly popular for several reasons:
- Visual Appeal: Silhouettes can transform ordinary windows into stunning displays that capture the essence of the holiday season.
- Affordable Decoration: Creating your own silhouettes is a cost-effective way to decorate your home.
- Customizable: You can tailor your designs to reflect your personal style or holiday themes.
- Community Spirit: Beautiful window displays can foster a sense of community, encouraging neighbors to participate in festive decorations.
Materials Needed
Before diving into the crafting process, gather the following materials:
- Black construction paper or cardstock
- Scissors or a craft knife
- Glue or double-sided tape
- Window clings or transparent tape (for sticking to windows)
- Template designs (available online or hand-drawn)
- Light source (optional, for backlit effects)
Step-by-Step Guide to Crafting Christmas Silhouette Windows
Step 1: Choose Your Design
The first step in creating your Christmas silhouette windows is to decide on the designs you want. Popular themes include:
- Christmas trees
- Santa and his sleigh
- Reindeer
- Snowflakes
- Nativity scenes
You can find free templates online or draw your own. Ensure the designs are simple yet recognizable to maximize their impact.
Step 2: Prepare Your Materials
Once you have your designs, gather your materials. Lay out your black construction paper or cardstock on a flat surface. Make sure you have a sharp pair of scissors or a craft knife for precise cutting.
Step 3: Trace Your Design

Using a pencil, lightly trace your chosen design onto the black paper. If you’re using a template, you can place it beneath the paper and trace around the edges. Remember to keep the lines clear and easy to follow to simplify the cutting process.
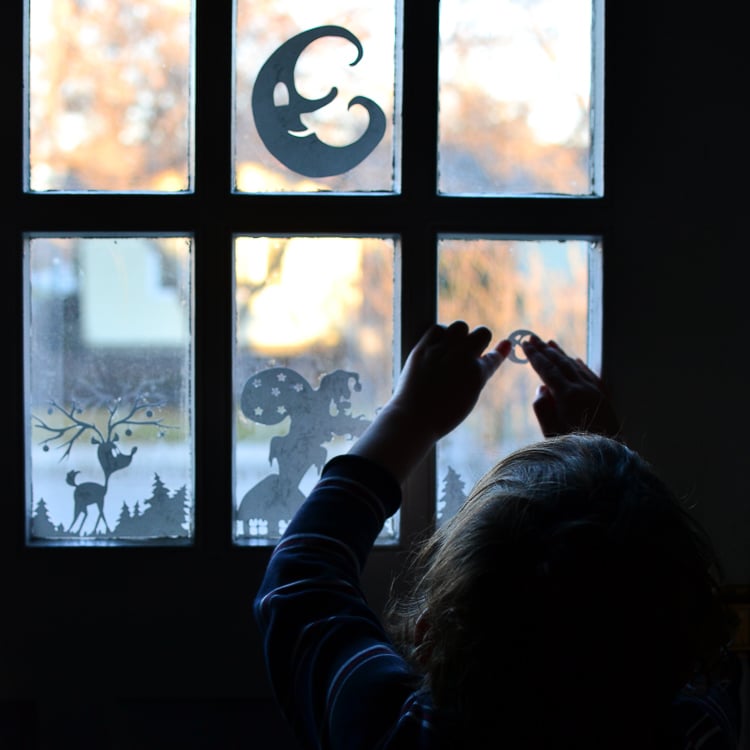
Step 4: Cut Out the Silhouettes
Carefully cut along the traced lines to create your silhouettes. Take your time and use a steady hand to ensure clean edges. For intricate designs, consider using a craft knife for more control. It’s advisable to cut out your silhouettes over a cutting mat to protect your work surface.
Step 5: Prepare Your Window
Before attaching the silhouettes, clean your windows to ensure they are free of dust and dirt. This will help the silhouettes adhere better and look more vibrant.
Step 6: Attach the Silhouettes
Using glue or double-sided tape, carefully attach your silhouettes to the window. If you want to avoid any residue when it’s time to take them down, consider using window clings or transparent tape. Position the silhouettes so they can be viewed clearly from the outside, and allow space for light to shine through.
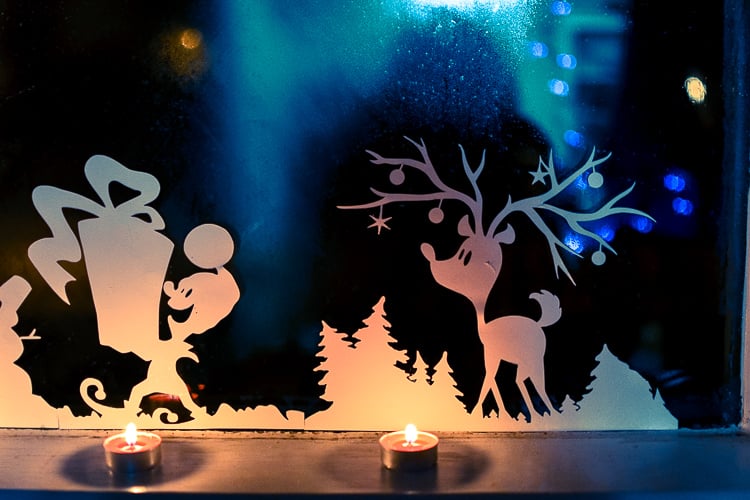
Step 7: Add Lighting (Optional)
For an extra touch of magic, consider backlighting your silhouettes. Place a string of fairy lights or LED candles behind the silhouettes to create a glowing effect. This will enhance the visibility of your designs during the evening and create a warm, festive atmosphere.
Additional Tips for Beautiful Silhouette Windows
To elevate your Christmas silhouette windows, consider the following tips:
- Layering: Create depth by layering multiple silhouettes at different heights.
- Color Variations: While black is classic, try using colored paper for a unique twist.
- Seasonal Themes: Change your silhouettes each week leading up to Christmas for a dynamic display.
- Incorporate Natural Elements: Surround your silhouettes with garlands, wreaths, or ornaments for added festive flair.
Case Studies: Inspiring Examples of Christmas Silhouette Windows

Many families and communities have embraced the art of silhouette windows. Here are a couple of inspiring case studies:
The Smith Family

The Smiths decided to turn their home into a festive wonderland last Christmas. They crafted silhouettes of Santa, eight reindeer, and a snowman. By adding fairy lights behind their silhouettes, they created a stunning effect that drew compliments from neighbors. The Smiths reported that their decorations not only brought them joy but also inspired a neighborhood decorating contest that fostered community spirit.
The Community Center Initiative
A local community center organized a workshop where families could come together to create Christmas silhouette windows. The event encouraged participation from all ages, and the center displayed the finished products in their windows. This initiative not only beautified the center but also engaged the community in the holiday spirit, with increased foot traffic and social media buzz surrounding their displays.
Crafting beautiful Christmas silhouette windows is a delightful way to celebrate the holiday season. By following this DIY guide, you can create enchanting displays that bring joy to your home and your community. Remember to choose designs that resonate with you, take your time during the crafting process, and consider incorporating lighting for an added touch of magic. As you embark on this creative journey, you’ll not only enhance your home’s festive spirit but also create lasting memories with family and friends. So gather your materials, unleash your creativity, and let your windows tell the story of Christmas!


